In February of 1999, a truck backed into my right front fender in a parking lot. Fortunately, I was in the car and the car was stopped. After doing some research, I discovered that the stripes for that fender were no longer available, but an entire stripe kit was available from Lauren Engineering (or from Stencils and Stripes, who makes the Lauren kit) for about $600. I took the information, along with the results from my failed parts search, with me to Allstate for their repair estimate. I was pleased to find out that they had no problem paying for the entire stripe kit, a total of over $1200 for the entire repair.
Well, since now I had a stripe kit I figured that I "might as well" paint the whole car. It needed it, the silver lacquer paint was microcrazing on the horizontal surfaces, the paint was falling off the passenger's side mirror, and large chunks were flaking off the front bumper, which was actually a chromed one someone had sanded and repainted in a previous repair. After hunting around I got paint estimates from several people on both ends of the spectrum, from $800 at Maaco to the best place in town that wanted over $3000 to media blast the entire car and paint it. I ended up having a local painter, Chris Coble, paint it. He had painted my brother's low-rider truck several years ago, and after talking to the guy and seeing all the Rods and Classics in his shop, as well as the hundred or so pictures on the wall of his work (many of the Hot Rods I recognized, including the Police's Camaro), I knew I had my guy. He works for about half the price of most of the places in town (works out of his shop in the middle of nowhere), and came in under bid by $150! He's in big demand, and it's just him and he's a perfectionist, so he's a little slow, but I had time, and it was worth it!
I removed everything possible from the car myself (stripes, trim, grilles, bumper, signals, lights, marker lights, spoiler, airdam, hood bump, side molding, etc). I didn't remove the mirrors or the stainless trim around the windows. I wish I had pictures of the H/O naked, but the batteries on the camera went dead. It was fun driving the 20 miles out to Colbert with no marker lights, grilles, bumper, plates, or turn signals. Took the back roads and had my SO tail me. I did put the taillights back in for the trip though.
Before sending it to be painted, I re-epoxied the tips on the spoilers. The wingtips falling off is a chronic problem with H/O's. New tips are not available. My left one looked good, but the seam on the right was cracking. It didn't want to break clean off (I didn't try too hard though), so I used a Dremel tool cutoff wheel and cut the old epoxy out of the seam, leaving a valley. I sanded the edges, cleaned it out, and then filled it with new 3M Structural Adhesive expoxy and wiped off the excess. Now the seams look even better (smoother, more even) than the factory ones did!
Chris did the body work on the fender, as well as welding up the holes from the non-factory door guard my car had, filling in all the little dings you have on a 15 year old car, and even smoothing out the crummy factory weld at the top of the B pillars. He painted my car with PPG Deltron Acrylic Urethane, in the factory color, followed by color sanding and buffing. Two coats base and three or four coats of clear I think. He prefers that type of paint and prefers more clear rather than more base, so I went with his recommendations. It looks great. I was a little worried about the microcrazing coming through, since over half of the places I talked to said it would have to come down to bare metal. Chris didn't go that far, but he "sanded the piss out of it" and then applied a sealer.
The factory rock chip guard on the rocker panels was in very good shape (as was the black paint down there), so he was able to just lightly sand it before repainting and not destroy the texture. If you do need to reapply the texture, 3M makes a rocker panel spray part # 05911. The stuff is clear and is sprayed over the primer and you paint right over it.
Make sure your painter uses a flex additive on the header panel and rear bumper filler. Mine were removed and painted separately.
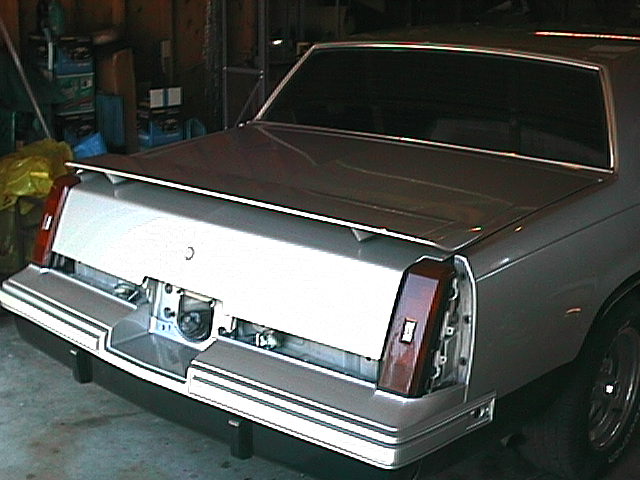
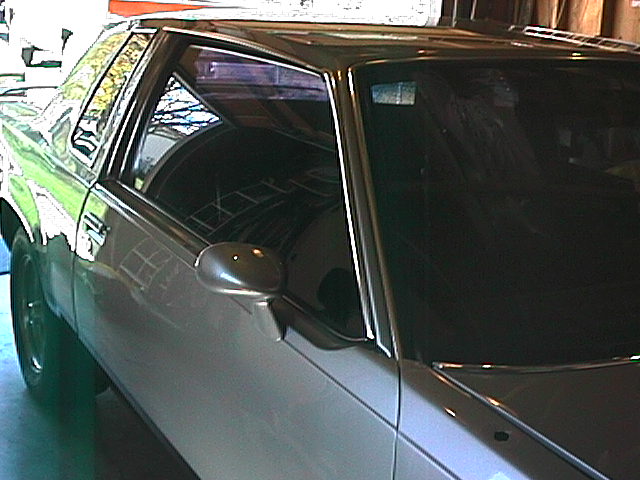
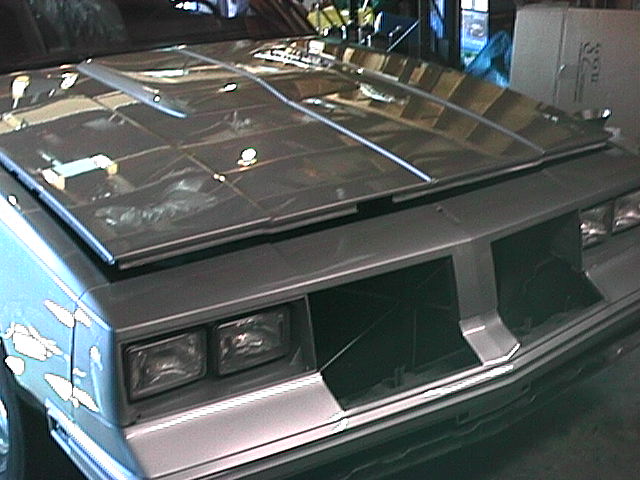
Here are some pictures of the freshly painted car, before stripes and all the misc. trim was re-applied (only enough was applied to drive it home). Sorry, I don't have any pictures of it as it sat before being painted. The batteries on the digital camera went dead, and I was in a race against time to get the car prepped and couldn't spare the time to get new batteries.
Image 1
Image 2
Image 3
Image 4
During the time it was being painted, I had a number of little restoration projects going on at home.
I sanded the taillight bezels and headlight bezels with 400-grit, and masked off a set of NEW '84 Calais grilles (mine were pretty faded), and then painted them all with SEM Original Trim Black spray paint. Looks spectacular! The Calais grilles are still available from the dealer or from Tamraz's and are exactly the same except the black plastic has been painted gray.
The trim piece at the base of the windshield was removed and also re-painted with the SEM Original Trim Black. Wiper arms cleaned up nicely and didn't need painting.
Taillights and side-marker lights were buffed with Meguair's Fine-Cut cleaner and a random orbit buffer. They look like new!
The front bumper and bumperettes were removed, sand blasted, and powder coated in gloss black. These look fabulous, should be very durable, and it was surprisingly affordable ($60 for blasting and coating everything).
The wheels were removed and the milky, flaking-off clear coat was chemically stripped with a spray-on paint stripper. If you undertake this task, definitely wear solvent-resistant gloves and eye protection. It'll take three or four coats of stripper (about 2 cans for 4 wheels) to get all the stubborn areas, hosing it off between coats. Scrape the first two coats off with a plastic scraper (this will get 95% of it), and from there switch to a plastic scrubber pad. This is the kind you might have in your kitchen, it's a ball of plastic mesh-like material. Kind of like steel wool, only plastic. Don't use steel wool or you'll scratch the chrome underneath. After you're done you can buff the chrome with a buffer wheel on a drill and some jewelers rouge for a mirror-like shine. The wheels are painted argent around the lug nuts. I didn't repaint that portion since I know other people who have stripped their wheels and not repainting that hasn't caused problems. I then put the red stripe back on, using 3/16" Tomato Red pinstriping tape, doing it freehand. It took a few tries to get the hang of it, and to get it where I liked it, but I had enough on the roll for probably 6 or 8 wheels, and the striping tape is cheap and easy to remove too. The best advice I can give for this process is to cut off the amount of tape you need (having the roll kicking around is a pain, 3 1/2 times the wheel diameter is plenty) and place it by putting your pointer finger knuckle inside the rim and using your thumbnail to keep the distance constant. Also be careful not to stretch the tape, it stretches pretty easily. It doesn't look "perfect", but everything considered the wheels look much better than they did before! I was actually considering some aftermarket wheels, not anymore!
I put in a new GM hood insulator pad too. My old one wasn't in too bad of shape, but you basically have to destroy it to get it off in order to get at the bolts holding down the hood scoop (bump). Don't bother trying to save the clips, just snip 'em off and buy new ones. They have them at Eagle Hardware in the bulk bins! You'll also find new speed nuts and plastic inserts for the licence plate screws and rubber washers for around all the lights there too.
I repainted the center portion of the airdam with some gloss black flexible bumper paint. It was chipped and scraped up badly. I sanded it before repainting, but the chips are pretty deep and show up through the new paint. If I sanded it down enough to remove the chips, I'd be through the gel-coat that's on this rubbery plastic stuff. Since you really don't see that part without getting down on your hands and knees, I figured this was good enough. The side parts were in pretty good shape and came out pretty nice with a good buffing.
Okay, it's all back together and now it's time for the stripes! The kit I got from Lauren Engineering is complete and comes with one extra "Hurst/Olds" logo too. The straight portions of the stripes went on just fine and fit great, but the parts over the wheel wells were a real b*tch! I never did get them to fit "right", and there's at least one small crease in the stripe on each wheel well. I'm not sure if it's the fault of the stripes or the installer (mine are installed about 1/8" higher than they should be because the painter put on too much black!)
Here's what you'll need to install your stripes. Much thanks to Mark Cornea (aka Dr. Decal) for the recommendations.
Once it was all together, it was time for new mudflaps to protect the new paint. I used some plastic "Oldsmobile" logo mudflaps that were only a few bucks at the local Al's Auto Supply. They look good and since that's what was on there before, I was able to reuse the existing holes.
As the finishing touch, I got new striping tape for inside the door handles. It's 3M Metallic Silver, 1/2" wide, in case you're interested. Should be able to get it at any auto paint/trim shop.
It was about 6 weeks worth of weekends from start to finish. I owe my SO a lot of time alone with her :-). As of this writing, the car's ready to hit the road, I'm just waiting for it to stop raining. It's forecasted to rain all week, and since this is as close as I'm likely to ever get to owning a new car in my lifetime, I'd like it to stay clean for at least ONE day, thank you.
On the agenda for the near future:
Polishing all of the stainless steel trim (going to try using the buffer wheel for my Dremel tool while the trim is still on the car).
A good wax job when the paint is cured.
Shampoo the interior.
Mild detailing of the engine compartment (since it's a daily driver it gets dirty again too fast to go overboard with).
New steering wheel cover.
Repaint the inside of the trunk.
BACK to the main page.